

B9X Voice Server Documentation
Compatible with Windows 8.1 and above. Including Windows 10 and 11.
Copyright © 2026 by B9X Electronics
All Rights Reserved.
This download is not digitally signed. This file does NOT contain any viruses, does NOT contain any type of malware, does NOT contain any type of ransomware, and does NO form of user data collection or spying.
Since it is not signed, you will get messages from Windows and antivirus software. Just ignore the ‘Windows Protected Your PC’ messages and select ‘More Info’ | ‘Run Anyway’. An exception may also need to be added to your anti-virus software. We apologize for this inconvenience but this was implemented by Windows along with antivirus companies and we know of no way to avoid this.
You may try to eliminate anti-virus warnings by downloading the zip file above, right click on it and scan it for viruses. You should see that the file is free from any type of viruses. This seemed to have worked with AVG anti-virus software.
Introduction
B9X Voice Server is a central point where smart phones, tablet computers, and other devices can connect and talk with each other. Anyone connected can hear what anyone in the group has to say. When you decide to participate, anyone in the group will hear you when pressing ’Push To Talk’. Its like one big voice chat room where everyone gets to talk, in real time voice, with low latency.
B9X Voice Server works seamlessly together to facilitate all aspects of real time voice conferencing. With this combination you can:
- Set up a voice chat room where friends and family can talk with each other.
- Set up a voice conferencing server for groups that discuss special interests of their own.
- Stay in communication with work groups at your company
- Stream music or audio from any receiver to multiple connected clients.
- Operate your radio as a remote base or setup a simplex node where multiple Internet clients and radio stations can converse.
Product Features:
- Rigorous, Time-Tested Design Provides Error Free Operation.
- Low-Latency Real Time Audio.
- Secure Internet/WiFi 256 Bit AES Encryption.
- Secure Point-To-Point Internet/WiFi 256 Bit AES Encryption Of All Audio.
- Multiple Client Devices Can Be Connected All At Once.
- Provides Free Client SDK for both Windows And Android devices.
- Audio Rate At 11,025 Hz.
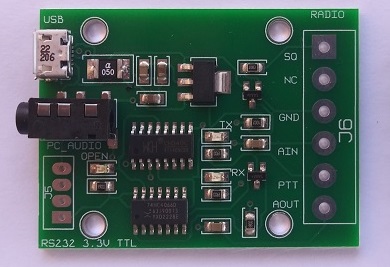
- Connection(-optional-) of an external radio that has a 6 pin mini-din connector.
Installing And Operating B9X Voice Server And Client
1) Download, unzip, and run/install trial demo on your Windows PC. The trial demo can be found on our Client SDK pages.
Notes For Windows 10 and Windows 11:
When downloading, Microsoft Defender will indicate this file is from an ‘Unknow Source’. This is because the installation exe is not digitally signed. This is done to assure the privacy of the individual developer(s). Just select ‘More Details’ | ‘Run Anyway’ to start installation.
2) Agree to terms of license and accept defaults.
3) Click ‘Finish’ when installation is completed.
4) Double click on icon to start the server.
5) On startup, select ‘Allow Access’ from the firewall dialog pop-up. You may have to manually add this program as an allowed exception in your firewall software.
6) The main windows title bar contains the IP and port to use for making a connection from your client.
The Server Main Dialog

The main dialog is somewhat self explanatory. The title bar shows the software name, the IP, and the port where it accepts connections. You can hide this dialog by selecting File | Hide. This will minimize the dialog to a tray icon. Double click on the tray icon to show the dialog again.
The Preferences Dialog
The preferences dialog can be viewed by clicking on the Edit | Preferences menu choice. This dialog is for setting all the server parameters. Any changes made on this dialog requires that you restart the server program.
Click on Edit | Preferences to modify the server’s properties.
The ‘Server Identifier’ and is not used. You can set this to anything.
The ‘Admin Password’ text box is for setting the server’s password and is the password that all clients can use to connect to the server. It can be up to 20 characters long and is case sensitive. Connecting to the server, using this password, allows the client both voice and broadcasting capabilities. The initial value of the “Admin Password” is ‘adminPassword’. We strongly suggest that you define your own password(s).
The ‘Password’ text box is for setting the server’s password and is the password that all clients can use to connect to the server. It can be up to 20 characters long and is case sensitive. Connecting to the server, using this password, allows only voice capabilities. The initial value of the “Password” is ‘password’. We strongly suggest that you define your own password(s).
The key is used so that client-to-server and server-to-client connection(s) are totally encrypted. This allows for secure communications between clients. The key at your server must also match the key set at the clients. You can use any alpha-numeric characters but must be exactly 32 characters long.
The default port that will appear is 18000. The port number can be changed by adding the desired port number as a command line argument in the server desktop icon. To change the port number to 25000 – add “[25000]” as a command line argument. All command line arguments have a space after the .exe and a space between each parameter. This port number must be provided to the client so they can connect to your server.
The about dialog provides software information. The version is the current installed version. It additionally has licensing info.
Making Your Server Available On The Internet
It is required, on the server side only, that you also enable port forwarding on your router and configure your server PC with a static LAN IP. Port forwarding enables Internet stations to reach your server. This is only required for the B9X Voice Server’s PC. Client apps do not require router setup on their access point.
Accessing residential routers are typically done utilizing your web browser to access the router’s built-in web server. Each router has its own type of configuration page but the principle remains the same. Typically you access the page that’s called Port Forwarding/Port Triggering. Anyone familiar with hosting servers behind routers or configuring online gaming consoles should be familiar with how to set up router port forwarding.
Since most residential routers use a dynamic Internet IP, it may be helpful to use one of the free dynamic DNS hosting services(i.e. www.duckdns.org). This will allow you to use a unique domain name that will always be updated to your current Internet IP. This will allow your server to be accessed anywhere on the Internet.
The router must forward UDP traffic on the server’s port to the PC hosting the B9X Voice Server. In the default case, that would be port 18000.
References And Disclaimer
B9X Electronics
Website: https://b9xelectronics.com
B9X Voice Server™ and B9X Voice Client™ are trademarks of B9X Electronics.
Windows™ is a trademark of Microsoft Corporation.
Xojo™ is a trademark of Xojo.
B4A™ is a trademark of Anywhere Software.
Android™ and Google™ are trademarks of Google.
Yaesu™ and products mentioned are trademarks of Yaesu/Vertex Standard.
Icom™ and products mentioned are trademarks of Icom.
All other references are trademarks and copyrights of their respective holders.
The specifications in this document are only given to provide information, without any guarantee in regards to either mistakes or omissions. B9X Electronics reserves the right to make changes to the products contained in this publication for any reason.
IN NO EVENT WILL B9X ELECTRONICS BE LIABLE TO YOU OR ANYONE FOR ANY DAMAGES, INCLUDING BUT NOT LIMITED TO INJURY TO PERSON OR PRODUCT, LOST PROFITS, LEGAL COSTS, LOST SAVINGS, OR OTHER INCIDENTAL OR CONSEQUENTIAL DAMAGES ARISING OUT OF THE USE OR INABILITY TO USE THIS AND ANY OF OUR PRODUCTS.