
B9X Electronics · Windows voice and radio linking
B9X PTT Chat Radio For Windows
Connect your Windows PC—or a compatible radio interface—to your B9X Voice Server. Speak with other connected users, listen to group conversations, or use the PC as a link between local radio audio and your voice server.
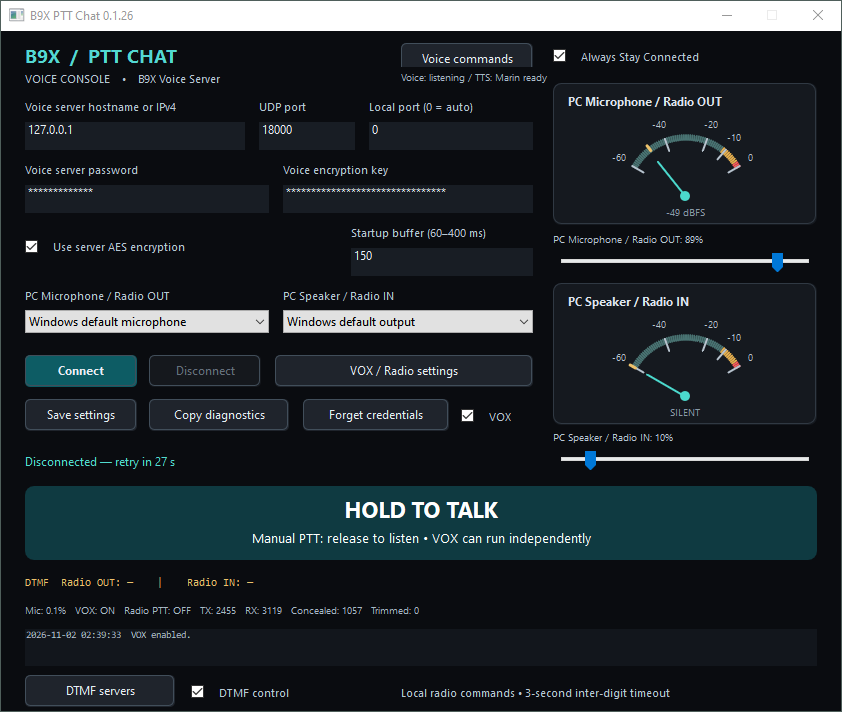
A compact dark console brings together manual push-to-talk, hands-free VOX, analog audio meters, independent volume controls, and selectable RTS or DTR transmitter control. For radio operation, add a Morse identifier, saved server commands, DTMF connection control, and optional spoken commands and AI-generated connection announcements.
One application, two ways to operate
PC voice station
Choose a microphone and headphones or speakers, connect to the B9X Voice Server, and hold the on-screen PTT control to talk. Enable VOX if you want microphone audio to start transmission automatically.
Radio-to-server link
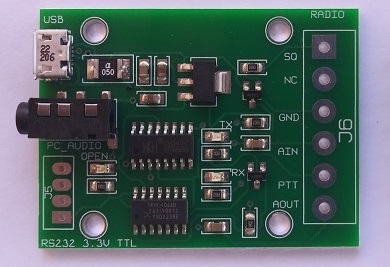
Connect a radio through a suitable audio/PTT interface. Local received radio audio can be sent to the server, while incoming server audio plays into the radio transmitter. The selected RTS or DTR output controls transmitter PTT.
This is a half-duplex application: take turns speaking. The B9X Voice Server distributes the active talker’s audio to its connected listeners. This application is a client; it does not replace the B9X Voice Server or provide an AllStarLink, EchoLink, or IRLP bridge.
Features at a glance
- Large manual PTT control and adjustable microphone VOX.
- Microphone and speaker analog meters with separate saved volume controls.
- Adjustable startup buffering for different network conditions.
- Selectable RTS or DTR PTT, active polarity, transmitter lead time, and release delay.
- Morse identification with a configurable call sign, frequency, speed, and interval.
- A saved server database with DTMF connect/close commands, spoken command words, and comments.
- Optional OpenAI spoken connection commands with a user-defined beginning word.
- Morse connection confirmations or optional Marin AI-generated spoken confirmations.
- Always Stay Connected startup and retry operation.
- Saved connection credentials, activity information, and copyable diagnostics.
What you need
- A 64-bit Windows PC with working audio input and output.
- Access to a compatible B9X Voice Server, including its hostname or IPv4 address, UDP port, password, and matching encryption settings.
- A microphone and headphones or speakers for PC operation.
- For radio linking: a compatible radio, suitable audio/PTT interface, appropriate cables, and an available COM port if using RTS/DTR control.
- Internet access for remote servers and optional OpenAI features. A local B9X Voice Server can be used over the LAN.
The supported voice format in this version is 11025 Hz, stereo, 16-bit PCM. The usual server port is UDP 18000; always use the port configured by your server operator.
Installation and first connection
- Extract the complete application folder. Keep the executable, its library folder, and all supplied support files together. Do not run directly from inside a ZIP or copy only the EXE. The supplied build’s executable may be named
B9XPTTChat.exe. - Connect your audio devices before opening the application. For the first test, use a microphone and headphones, with radio PTT and VOX disabled.
- Enter the server hostname or IPv4 address. Enter only the address—not
https://, a web-page path, or a port appended to the hostname. - Enter the server’s UDP port and password. Leave Local port at 0 unless your installation specifically needs an unused fixed local port.
- Match the encryption setting. When the server uses encryption, select Use server AES encryption and enter its exact 32-character, single-byte key. The password and encryption key are separate values.
- Select the audio input and output. Choose the devices shown under PC Microphone / Radio OUT and PC Speaker / Radio IN.
- Start with a 150 ms startup buffer and moderate audio levels. Click Save settings.
- Click Connect and wait for the connected/listening status. A connection is established only after the server accepts it.
- Hold the HOLD TO TALK area while speaking, then release it to listen. Have another connected user verify your audio in both directions.
Manual PTT requires the application window to remain active. Losing focus releases manual PTT. A three-minute transmit limit also releases manual PTT. With VOX disabled, a moving microphone meter does not mean microphone audio is being sent.
If Windows asks whether to allow network access, permit the application on the network profile you use. Remote access requires the server’s UDP port to be reachable. The client normally sends an outbound connection to that server; it does not require the separate DNS-update or voice-relay ports.
Audio directions, meters, and volume
| Control label | Meaning | Radio connection |
|---|---|---|
| PC Microphone / Radio OUT | Audio entering the PC and available to send to the voice server. | Radio receiver audio output feeds the selected PC input. |
| PC Speaker / Radio IN | Audio leaving the PC: received server speech, Morse ID, and local confirmations. | The selected PC output feeds the radio transmitter’s audio input. |
Radio OUT means audio coming out of the radio; Radio IN means audio going into the radio. For PC-only use, these are simply the microphone and listening devices.
The analog meters show digital peak levels from approximately −60 to 0 dBFS. Zero dBFS is digital full scale. Keep normal speech comfortably below the top of the scale; a high reading does not prove that the radio’s transmitter audio level is correct. The meters are audio-level indicators, not calibrated RF or transmitter-deviation meters.
- MIC VOLUME: 0–100%; 0% mutes the outgoing microphone audio and 100% preserves its original level. It affects VOX sensitivity because it is applied before VOX transmission decisions.
- SPEAKER VOLUME: 0–100%; controls received speech and locally generated ID/confirmation audio. Muting this output does not disable radio PTT or the ID timer.
- Both volume settings are restored at startup and saved on normal exit or with Save settings. They adjust this application, not Windows’ system volume.
The microphone meter runs while connected and can also operate during enabled offline radio-command monitoring. The speaker meter includes local ID audio and may move slightly before the sound is heard because playback is buffered.
Adjusting the startup buffer
The available range is 60–400 ms. Start with 150 ms. If an otherwise working cellular connection delivers audio unevenly, try 200 ms and then 250 ms, reconnecting after each change. More buffering adds listening delay and cannot restore audio lost during a sustained network interruption.
Hands-free VOX operation
VOX sends microphone audio automatically when it exceeds a chosen level. Open VOX / Radio settings, select Enable microphone VOX, set the trigger and off delay, and click Save settings. The main-window VOX checkbox provides quick enable/disable control.
| Setting | Range | How to use it |
|---|---|---|
| VOX trigger level | 0.01–100% | Lower is more sensitive. Set it above idle noise but below normal speech. If necessary, try a fractional value such as 0.2%, then adjust for your input. |
| VOX off delay | 100–5000 ms | Keeps transmission active briefly after speech falls below the trigger, reducing interruptions between words. The initial default is 800 ms. |
If background noise keys VOX continuously, raise the trigger or correct the input level. If speech does not trigger it, lower the trigger and check the microphone volume and selected device. Use headphones for PC testing to reduce acoustic feedback.
VOX can operate while the main window is inactive. Received playback is muted/reset during local voice transmission to avoid playing a loop back into the microphone.
Connecting a radio and selecting RTS or DTR
- Disconnect from the server before changing radio-interface settings.
- Feed the radio’s receiver audio into the PC input selected under PC Microphone / Radio OUT.
- Connect PC Speaker / Radio IN to the radio’s transmitter audio input through a suitable interface.
- Open VOX / Radio settings and select Enable radio PTT on serial output.
- Enter the interface’s COM port, such as
COM3. Select RTS or DTR under PTT line. RTS is the default. - Leave Asserted = transmitter keyed selected if that matches your interface. Clear it only if the interface requires inverted operation.
- Set the lead and off delays, save, and reconnect. Test audio and transmitter keying with your actual interface.
| Setting | Range / initial default | Purpose |
|---|---|---|
| PTT lead | 0–1000 ms / 50 ms | Keys the transmitter before audio begins so the first sound is less likely to be cut off. |
| PTT off delay | 0–3000 ms / 300 ms | Holds PTT after playback finishes to avoid premature release. |
| PTT line | RTS or DTR / RTS | Chooses the serial control output used by the interface. |
The selected output keys for received network speech, Morse identification, and local connection confirmations. It stays keyed while the required playback finishes. CTS is an input and is not a transmitter PTT option.
Morse code identification
Open VOX / Radio settings and enter the identification settings:
| Field | Setting |
|---|---|
| Call sign | Letters, numbers, spaces, and slash. Leave empty to disable the IDer. |
| Tone | 300–2000 Hz; initial default 800 Hz. |
| Speed | 5–40 words per minute; initial default 20 WPM. |
| Interval | 1–3600 seconds; initial default 600 seconds = 10 minutes. |
The first incoming voice after connecting starts an ID when a call sign is configured. Further IDs are triggered when the interval has elapsed and incoming voice is present. It is not a timer that transmits continuously on an idle channel.
The ID mixes with audio on the selected speaker output; it is not sent back to the voice server as microphone audio. If received speech stops while the ID is playing, the ID continues and transmitter PTT remains active until playback finishes. Disconnecting, an error, or a transmit safety limit can interrupt it.
Saved servers and DTMF radio commands
Click DTMF servers, select New, enter a record, and click Save server. The saved-server dropdown begins with the comments field when comments are supplied, making entries easier to recognize.
| Field | Example / purpose |
|---|---|
| DTMF connect command | *101# — connects this server record. |
| DTMF close command | *100# — closes this server record’s active connection. |
| Server hostname or IPv4 | The actual B9X Voice Server address. |
| UDP port | Usually 18000; match the server. |
| Server password | The password accepted by this server. |
| 32-character encryption key | Exactly 32 single-byte characters matching the server. |
| Spoken connect / close words | Optional phrases for voice commands. Omit the beginning word here. |
| Comments | A meaningful label, such as “Local radio group,” plus any notes. |
DTMF commands use 2–16 characters from 0–9, *, #, and A–D. Connect and close sequences must be unique across the database, and one sequence cannot be the beginning of another. A final # is useful but not required. A second server could use *201# and *200#.
Operating from the radio
- Configure the radio input/output and RTS/DTR interface as described above.
- Enable DTMF control on the main window. This allows local radio-input monitoring even while disconnected.
- Key the radio, send the complete connect sequence, and release radio PTT.
- After the server accepts the connection and the local input becomes quiet, listen for Morse 5 or the enabled spoken confirmation.
- Send that record’s close sequence and release radio PTT to close the connection. Listen for Morse 0 or the spoken close announcement.
Use tones at least about 60–80 ms long, with at least 60 ms between digits. Keep pauses between digits shorter than three seconds; longer gaps discard the unfinished command. A held digit is counted once.
Commands are accepted from the local microphone/radio input, not from server-received voice. Commands during speaker playback or the short release interlock are ignored. The DTMF display shows detected digits for both audio directions; it does not remove their tones from the audio.
A different connect command can switch servers. A close command for a different host/port is ignored. A radio close also pauses automatic reconnection, including after a restart, until another connect command, manual Connect, or a change to Always Stay Connected clears the pause.
Select a saved record to edit it, and click Save server to commit changes. Closing the editor alone does not save unfinished edits. Delete server asks for confirmation.
Optional spoken connection commands
Open Voice commands. Enter your OpenAI API key, select a transcription model available to your API account, set your Beginning word or short phrase, enable OpenAI voice commands, and click Save voice settings. These commands are optional; ordinary PTT, VOX, and DTMF do not require OpenAI.
The beginning word defaults to B9X. For an easy example, change it to Radio. In DTMF servers, save ham station as one server’s spoken connect words. Say:
“Radio ham station” — connect that saved server.
“Radio disconnect” — close the current server using the built-in disconnect command.
Stop speaking and release radio PTT after the command. The beginning word belongs in Voice commands, not in the database’s spoken-word fields. The regular DTMF fields and server credentials are still required when saving a server record.
Matching ignores case and punctuation and tolerates limited transcription differences, common B9X spellings, and some polite wording. Distinct server phrases work best. Ambiguous matches, conflicting connect/disconnect requests, and clear negative commands are rejected rather than guessed. Similar numbered server names still require the correct number.
Speech detection uses the VOX trigger setting even if VOX transmission is disabled. A short qualifying utterance ends after roughly 0.8 seconds of quiet. Keep commands under eight seconds and wait for the result before repeating. The main Voice status line shows listening, transcription, a matched/unmatched phrase, or an API error.
Morse and Marin connection confirmations
Standard feedback is Morse 5: ..... for an accepted connection and Morse 0: ----- for closure. Tone frequency and speed use the Morse settings even if the ID call sign is empty.
Before replying, the local input must be below the VOX trigger for about 800 ms, with no DTMF tone held. Release the radio’s PTT after sending a command. Quiet detection listens to the raw input, so muting the application’s microphone volume does not make a noisy input count as quiet.
Enable Marin spoken confirmations
- Disconnect from the server and open Voice commands.
- Enter a valid OpenAI API key and select Marin spoken connect / close confirmations.
- Save the voice settings and wait for TTS: Marin ready.
- Connect and listen for “Connected to the voice server.” Close the connection and listen for “Connection closed.”
These are AI-generated announcements, not a human operator. The two fixed announcements are prepared while disconnected and saved locally. Once prepared, they play without a new speech-generation request for every connection. Initial preparation requires API access and separately billed usage; availability depends on the configured service and account.
Spoken confirmations can be enabled independently of spoken command recognition. If an announcement is disabled or unavailable, Morse feedback remains the fallback. Announcements and Morse play through PC Speaker / Radio IN, follow speaker volume, and use the selected RTS/DTR output and PTT timing when radio PTT is enabled. They are local output and are not transmitted to the voice server as microphone audio.
Always Stay Connected
Select Always Stay Connected to connect automatically when the application opens and retry after a failed connection or a detected loss. The checkbox and current settings are saved. The connection-loss detector can take about 60 seconds without replies to declare a loss; the 60-second retry wait starts after loss detection.
| Action | Behavior |
|---|---|
| Click Disconnect with Always Stay Connected still checked | Disconnects immediately, then schedules a retry about 60 seconds later. |
| Uncheck Always Stay Connected | Stops automatic retries; does not by itself close an existing connection. |
| Close through a radio command | Pauses reconnection until a new connect request or operator action clears the radio-close pause. |
| Close the application window | Cancels retries, releases transmitter PTT, and disconnects. The application does not continue as a background tray client. |
Saved settings and credentials
Save settings and Connect save the main server password and encryption key through Windows Credential Manager for the current Windows user. Device selections, volumes, connection fields, and radio settings are restored at startup. If a saved audio device is unavailable, the application falls back to the Windows default and reports that change.
Forget credentials clears the main connection’s saved password/key and their on-screen fields. It does not change the server’s credentials, and it does not delete separate server-database records or their saved credentials.
Saved server records and the optional OpenAI key are protected for the current Windows user. Moving a database or settings backup to another Windows account or PC may require re-entering secrets. Settings and the server database are kept under %APPDATA%\B9X PTT Chat; the existing folder name remains unchanged even though the product is now named B9X PTT Chat Radio For Windows.
The application does not write voice recordings for ordinary chat or command recognition. The optional fixed Marin confirmation audio is saved locally. Audio settings, diagnostics, and credential protection do not change the encryption capabilities of the existing B9X Voice Server protocol.
Troubleshooting
The application cannot connect
Confirm the hostname/IP, UDP port, password, encryption checkbox, and exact key. Start with a LAN test. For a remote server, confirm its UDP port is reachable from outside its network. Keep Local port at 0 initially and close any older application using a fixed local port you selected. Use Copy diagnostics to capture the failed attempt’s information.
Connected, but I cannot hear audio
Check PC Speaker / Radio IN, the application’s speaker volume, Windows output volume, and the physical device/interface. Verify another user is transmitting and the server uses the required audio format. During local transmission, receive playback is muted/reset to reduce feedback.
The microphone meter moves but nobody hears me
A moving meter only confirms local audio. Verify the connection is accepted and that you are holding manual PTT or that VOX is actively sending. Check microphone volume and server settings. Manual PTT releases when the window loses focus.
VOX is too sensitive or will not trigger
Lower trigger values increase sensitivity; higher values reduce it. Set a value above idle noise and below normal speech. Microphone volume affects VOX transmission sensitivity. Check the selected input and use headphones to limit acoustic feedback.
The transmitter does not key, or stays keyed
Check the COM port, RTS/DTR selection, interface wiring, active polarity, and whether another program owns the port. Incoming voice, a Morse ID, or a confirmation can legitimately hold PTT until playback and its off delay finish. Speaker mute does not disable PTT. Stop operation and verify hardware settings if the output does not release correctly.
No Morse or spoken reply after a radio command
Release radio PTT, wait for the quiet-input delay, and confirm the input noise is below the VOX trigger. Check the output device and speaker volume. A connect confirmation follows server acceptance, not merely a connection attempt. If Marin is selected, wait for TTS: Marin ready; otherwise expect Morse 5 or 0.
DTMF commands are not recognized
Enable DTMF control and check the Radio OUT digit display. Use clean, unclipped tones, deliberate key presses, short inter-digit pauses, and the complete saved sequence. Avoid sending commands during local output playback. Microphone volume does not adjust raw DTMF detection sensitivity.
Spoken commands are not working
Check the Voice status line, API key, account access, and selected transcription model. Confirm the configured beginning word and saved server phrase. Set the speech trigger above noise, speak a short command clearly, then stop. API or recognition errors leave the current connection unchanged; DTMF and manual controls remain available.
Audio is uneven on Wi-Fi or cellular
First compare with a clean LAN test. Improve signal and reduce interference; Ethernet or a suitable 5 GHz Wi-Fi connection can help when available. For cellular, place the hotspot where reception is strongest. Try a modest buffer increase. Buffering cannot fix a sustained outage or recover missing words.
Information to collect for support
Use Copy diagnostics after reproducing a problem. Include whether you were on a LAN, home Internet, or a hotspot; the selected audio devices; buffer setting; and, for radio issues, COM port, RTS/DTR choice, and polarity. Do not include your password, encryption key, or OpenAI API key.