
Your B9X Basic GUI Module Becomes a Wi‑Fi Handie‑Talkie.
Create a secure push‑to‑talk voice group through B9X Voice Server — then optionally connect an amateur radio so licensed operators can bring the group onto the air.
One Group. B9X Handie‑Talkies. And Amateur Radio.
B9X Voice Server is the central meeting point. B9X Basic GUI Modules join through Wi‑Fi/Internet. If a radio connection is desired, the included free Windows radio gateway app can join the same voice group and control/interface the DigiRig connection to an amateur transceiver.
From Internet PTT to the Airwaves
The idea is deliberately simple for the operator.
Load It and Connect
The complete B9X Basic handie‑talkie application is included. The source is open, ready to use, and ready to customize. Load it on the B9X Basic GUI Module, connect to B9X Voice Server over Wi‑Fi/Internet, and you have a touchscreen push‑to‑talk endpoint.
Talk Securely Online
The server brings the connected clients into one low‑latency voice group. B9X Electronics specifies AES encryption with a 256‑bit key for client/server voice and passwords.
Bridge to Radio — Optional
If you want an amateur‑radio connection, a free Windows app is included for the radio gateway. It connects to B9X Voice Server and controls/interfaces the DigiRig connection to a compatible transceiver, providing the audio and PTT path to RF.
The Software Is Included
This is not just a hardware concept. The software needed to get the B9X side of the system running is supplied with it, so you can start with a working application instead of starting from a blank editor.
Complete B9X Basic Handie‑Talkie Code
All B9X Basic code needed for the B9X Basic GUI Module handie‑talkie application is included. The source code is open and ready to use as supplied.
Customize the Source
Because the B9X Basic application source is provided, you can change the touchscreen, labels, controls, operating logic and other features to build the handie‑talkie you want.
Free Windows DigiRig App
If you choose to add an amateur‑radio gateway, a free Windows application is included to connect B9X Voice Server with DigiRig and control the radio interface. The radio connection is optional—the B9X Internet voice group works without it.
More Than a Walkie‑Talkie
The B9X Basic GUI Module is programmable, so the radio-style interface can be built around the needs of your group instead of being locked to one fixed front panel.
Large, clear controls for push‑to‑talk operation.
Show server connection and operating state on screen.
B9X Basic includes VoIP volume and microphone gain functions.
Add buttons, labels, meters, lamps, switches and other touchscreen elements.
Multiple connected clients participate through the central Voice Server.
B9X Voice Server is designed to support remote-base/simplex-node style radio integration.
The Amateur‑Radio Gateway
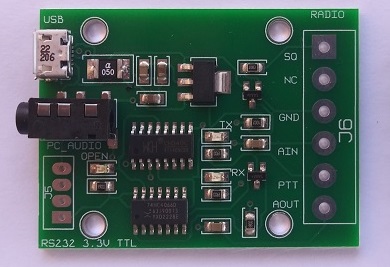
DigiRig Mobile combines a USB audio codec, serial/CAT interface and hardware PTT control. One USB connection goes to the Windows PC; the radio side carries the audio and PTT signals required by the gateway.
A Strong Fit for Radio Clubs and Experimenters
A QRZ visitor can immediately see the possibilities: a private Internet voice group for everyday communication, programmable B9X handheld-style clients, and an optional amateur-radio bridge when licensed operators want the conversation on RF.
Club Voice Group
Give members a simple PTT experience through the Internet without tying up an amateur frequency for every conversation.
Remote Radio
Use the radio gateway for remote-base or simplex-node style experiments supported by B9X Voice Server.
Build It Your Way
Create the touchscreen controls, indicators and workflow in B9X Basic rather than relying on a fixed-purpose radio client.
Build Your Own B9X Voice Network
Start with B9X Basic GUI Modules and B9X Voice Server. Add the amateur-radio gateway when you are ready to bring properly licensed operators onto the air.
Under The Hood
The B9X Wi-Fi Handie-Talkie isn’t a closed black box. The complete B9X Basic application is included, so you can see how the radio works, modify it, and use it as the starting point for your own communications projects.
One of the advantages of the B9X Basic GUI Module is that a fairly sophisticated touchscreen push-to-talk application can be written in understandable B9X Basic. The Handie-Talkie program creates the user interface, connects to the B9X Voice Server, monitors the microphone and battery, controls speaker volume, handles push-to-talk, stores the connection settings, and processes touchscreen events.
Two Screens, One B9X Basic Application
Main Handie-Talkie Screen
createMainScreen() builds the
primary operating screen. It contains the large Push To Talk
button, microphone-level meter, battery meter, connection lamp,
speaker-volume slider and Configure button.
Configuration Screen
createConfigScreen() provides
editable Host, Port and Password fields together with Connect,
Close and Main Screen controls. A built-in on-screen keyboard is
added for entering the connection information.
The screens were created with the B9X Basic Screen Designer and are then controlled directly from B9X Basic. Each control is assigned an element number so the program can determine exactly which control the operator touched.
The Main Screen Is Created in B9X Basic
For example, the large Push To Talk button is created with a single B9X Basic display command:
result = displayAddRoundedButton(PTT_BUTTON, 41, 349, 239, 90, "Push To Talk", 4, 10);
The program uses the same approach for the microphone meter, battery meter, connection lamp, speaker-volume slider and other controls. A background bitmap stored in SPIFFS supplies the graphical background:
result = displayAddBmpFromFile(0, 0, 0, "/spiffs/background.bmp", 0);
This makes the user interface customizable. The supplied application is ready to use, but it can also become the starting point for a completely different B9X Basic communications application.
Connecting to the B9X Voice Server
The vConnect() function reads the Host,
Port and Password directly from the configuration screen:
let host$=trim$(displayGetText$(TXT_HOST));
port=val(trim$(displayGetText$(TXT_PORT)));
let password$=trim$(displayGetText$(PTXT_PASSWORD));
The settings are saved in nonvolatile storage so they can be restored later:
retVal=setNVS("fHost", host$);
retVal=setNVS("fPort", str$(port));
retVal=setNVS("fPassword", password$);
The application then asks the VOIP system to connect to the B9X Voice Server:
retVal=voipConnect(host$, port, password$, "MYNODE", b9x_key2$);
for i=0 to 40 do
    retVal=voipIsConnected();

    if retVal==1 then
        retVal=voipStartListening();
        return 1;
    endif

    x=wait(250);
next
Information
Connection
Listening
Push To Talk Really Is Push To Talk
The touchscreen produces events that can be retrieved with
getDisplayMessage$(). The application
examines those events to determine which control was operated.
When the operator presses the Push To Talk button, the application starts transmitting:
if event==B9X_DISPLAY_PRESSED then
    if number==PTT_BUTTON then
        isSending=1;
        retVal=voipStartSending();
    endif
endif
Releasing the button stops transmission:
if event==B9X_DISPLAY_RELEASED then
    if number==PTT_BUTTON then
        isSending=0;
        retVal=voipHaltSending();
    endif
endif
Live Microphone Level
While transmitting, the program retrieves the current microphone level and displays it on the vertical Mic meter:
micLevel=voipGetMicLevel();

if isSending==1 then
    retVal=displaySetValue(MICLEVEL_VBAR, micLevel);
else
    retVal=displaySetValue(MICLEVEL_VBAR, 0);
endif
This gives the operator immediate visual feedback while talking.
Speaker Volume From the Touchscreen
The speaker-volume control is a normal touchscreen slider. When its value changes, the new value is sent directly to the VOIP audio system:
if event==B9X_DISPLAY_VALUE_CHANGED then
    if number==SPKVOL_SLIDER then
        retVal=voipSetVolume(value);
    endif
endif
There is no separate settings application required. The touchscreen control and the audio system are tied together directly in the B9X Basic program.
Connection Status at a Glance
The program continually checks the Voice Server connection. The Connected lamp on the main screen follows the actual connection state:
retVal=voipIsConnected();

if retVal==1 then
    retVal=displaySetChecked(CONNECTED_LAMP, 1);
else
    retVal=displaySetChecked(CONNECTED_LAMP, 0);
endif
Battery Monitoring
Battery level is also updated continuously and displayed on the touchscreen:
let blevel=batteryLevel();
retVal=displaySetValue(BATTERY_VBAR, blevel);
The result is a radio-style interface where the operator can see the battery condition without leaving the main screen.
Automatic Display Dimming
The application even handles display power management. User interaction restores full brightness. After approximately ten seconds without a touchscreen event, the program reduces the display brightness:
if (getTicks(1)-ticks)>10000 then
    ticks=getTicks(1);
    retVal=displaySetBrightness(5);
endif
When another display message arrives, the program returns the display to full brightness:
ticks=getTicks(1);
retVal=displaySetBrightness(100);
The Event-Driven Main Loop
At the center of the application is a straightforward B9X Basic
while loop. It updates the battery,
connection indicator and microphone meter, then checks the display event
queue for user activity.
The helper function getNthField$()
extracts information from the display message so the application can
obtain the element number, event type and current value.
let dmsg$=getDisplayMessage$();

if len(dmsg$)>0 then
    number=val(getNthField$(2, dmsg$));
    event=val(getNthField$(4, dmsg$));
    value=val(getNthField$(5, dmsg$));
endif
From there, ordinary B9X Basic if
statements decide what the application should do.
What the Included Source Demonstrates
Touchscreen GUI
Buttons, labels, sliders, lamps, vertical meters, password entry, backgrounds and the built-in keyboard are all controlled from B9X Basic.
Push-To-Talk VOIP
Connect, listen, start transmitting, stop transmitting, close the connection, adjust volume and monitor microphone level.
Persistent Configuration
Host, port and password settings are saved using B9X Basic nonvolatile-storage functions and restored when the Configure screen is opened.
Real-Time Status
The program continually updates connection status, microphone activity and battery level while remaining responsive to the touchscreen.
The Source Code Is Part of the Product
The B9X Wi-Fi Handie-Talkie application is supplied as B9X Basic source code. You aren’t limited to the interface or operating behavior shown here. The supplied program can be studied, changed and expanded to fit your own project.
Change the screen layout. Add controls. Change how PTT operates. Add status information. Integrate other B9X Basic features. Or use the Handie-Talkie program as the foundation for an entirely new communications application.
That’s the idea behind B9X Basic: powerful embedded applications that remain understandable and accessible at the application level.